What is TicketMate?
TicketMate is a multi-tenant helpdesk platform built and hosted in Australia. It gives your team a structured way to receive, track, and resolve support requests, whether they come in via email, a user portal, or a custom web form.
Each organisation gets its own isolated workspace with its own domain, branding, and data. Agents work from a clean admin panel. Users get a branded self-service portal. Managers get oversight without complexity.
A clean ticket queue, rich text replies, assignment, priorities, and status tracking. Everything in one place.
A branded self-service portal to submit tickets, track progress, and reply, with or without email.
Team management, custom forms, email routing, notification templates, mailbox configuration, and more.
100% Australian hosted. All data on Australian soil. No offshore processing. No exceptions.
Getting started
Once your account is provisioned you'll receive an invitation email with a link to set your password. Your workspace is available at your assigned subdomain (e.g. yourcompany.ticketmate.au).
First steps for admins
- Log in to the admin panel at
yourcompany.ticketmate.au/admin. - Invite your team. Go to Users and send invitations to agents. They'll receive an email with a secure setup link. For larger teams, use the Import button to bulk-import users from a CSV file.
- Configure your mailbox. Add an inbound email address under Settings › Mailboxes. Emails sent to this address will automatically become tickets.
- Create teams. Group agents into teams (e.g. Billing, Technical Support) so tickets can be routed to the right people.
- Set up custom forms (optional). Build structured intake forms for common request types like password resets or new starter onboarding.
- Share the portal link. Users access the portal at
yourcompany.ticketmate.au/portal. They can register and start submitting tickets immediately.
Tip: Ask your first agent to submit a test ticket via the portal and reply to it from the admin panel. This confirms your email pipeline is working end to end before you go live.
Branding & organisation settings
Your organisation's branding settings live at Settings › Organisation in the admin panel.
Logo
Upload your logo via the Branding section. Accepted formats: PNG, JPG, GIF, WEBP, or SVG, up to 2 MB. A transparent PNG or SVG is recommended. The logo appears in the portal header, admin panel header, and all PDF ticket exports.
Brand colours
- Brand colour: used for navigation, links, and headings across the portal. Defaults to TicketMate green.
- Accent colour: used for buttons, badges, and highlights. Defaults to gold.
Both colours also appear in PDF ticket exports. Each has a reset button to restore the default.
Tip: Changes apply immediately to the portal and all new PDF exports, no rebuild or redeploy required.
The user portal
The user portal gives your end users a self-service interface to submit and track support requests without needing to email directly. It's accessible at yourcompany.ticketmate.au/portal.
The customer portal ticket list, accessible at yourcompany.ticketmate.au/portal
Registering and logging in
Users can self-register using their email address. Once registered, they'll have access to all tickets they've submitted. Password reset is handled via email.
Submitting a ticket
Users can submit a ticket via the general form or via a custom form published by your admin team. The general form includes a subject, priority, and a markdown-enabled description field. Users can use basic formatting like bold, lists, and headings to describe their issue clearly.
Formatting tip: The ticket body supports markdown. Using a clear structure in the description, e.g. listing steps to reproduce or using headings for each question, makes tickets much easier for agents to triage.
Tracking and replying
Once a ticket is submitted, users can view its current status, read agent replies, and post their own replies from the portal. The reply box also supports markdown formatting.
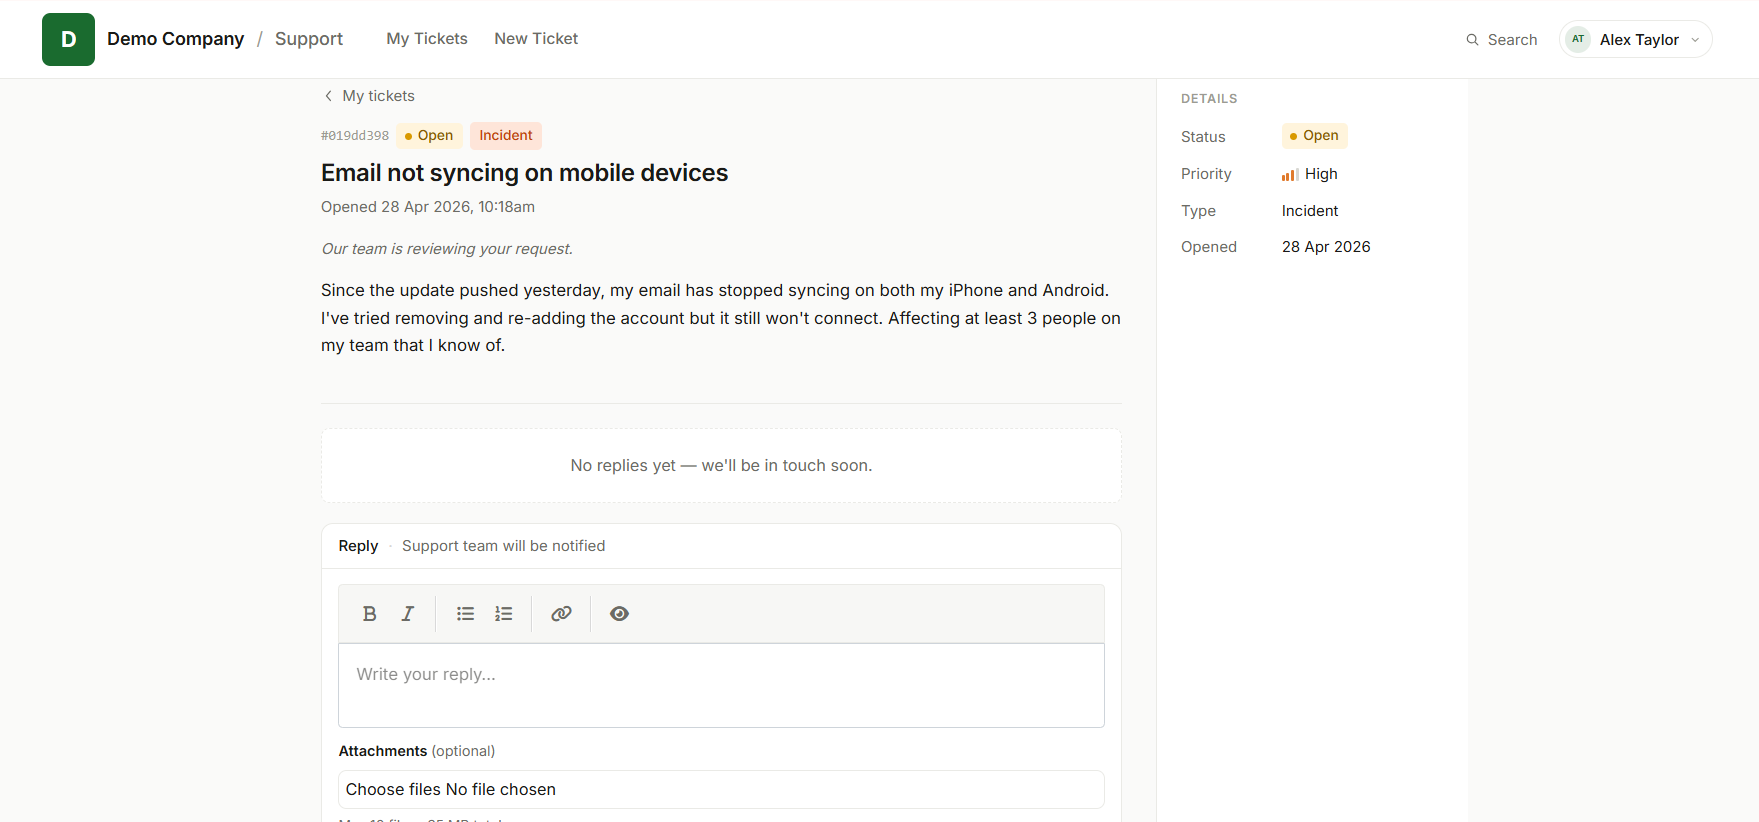
The ticket detail view: status, conversation history, and the reply editor in one place
Users can also reply by email. Simply reply to any notification email and the message will be attached to the ticket automatically. Signatures and previous quoted replies are stripped on a best-efforts basis.
Ticket statuses
- Open: ticket received, under review by the team.
- Pending: waiting on a third party or more information.
- On Hold: work has been paused, e.g. awaiting a vendor or scheduled maintenance.
- Closed: ticket resolved and closed. Users can reopen it from the portal or via the reopen link in their closure email.
Multi-factor authentication
Users can enable MFA on their account from the portal settings. If your admin has made MFA mandatory for the workspace, users will be prompted to set it up on first login. See Security & MFA for more detail.
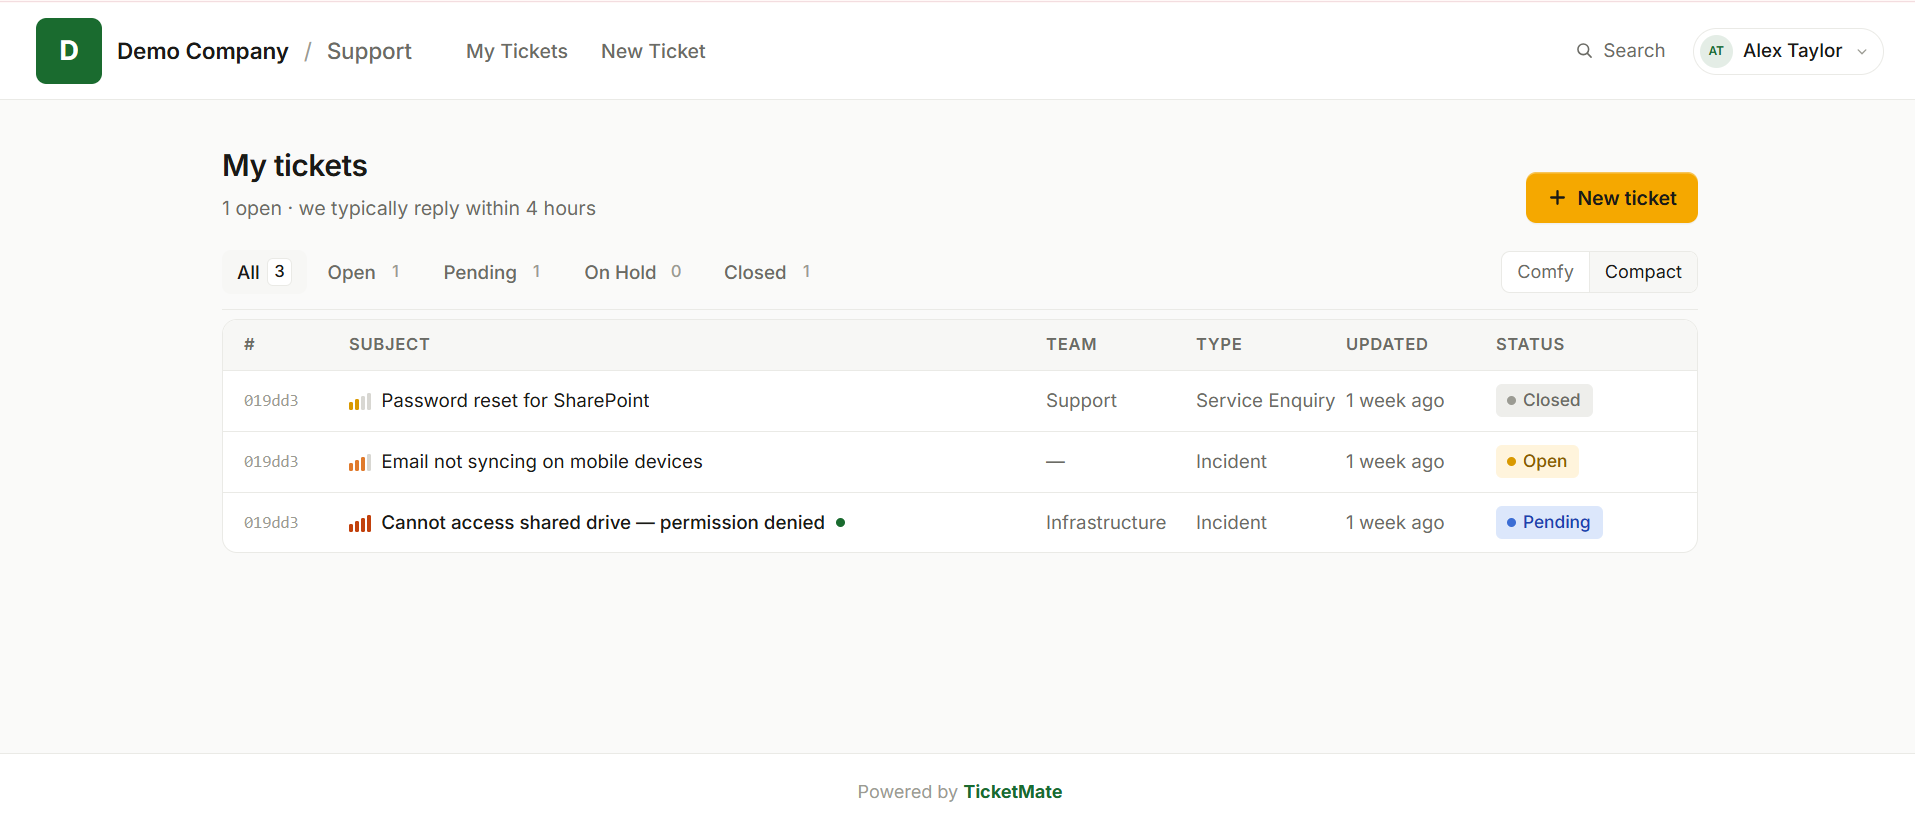
Managing tickets
Agents manage tickets from the admin panel at yourcompany.ticketmate.au/admin. The ticket list shows all open tickets with sortable columns for status, priority, assignee, and last updated.
Ticket fields
- Subject: a short description of the request.
- Status: Open, Pending, On Hold, or Closed.
- Priority: Low, Medium, High, or Critical.
- Type: Incident, Service Request, Service Enquiry, or Internal. Internal tickets are visible to agents and admins only and do not appear in the customer portal.
- Assignee: the agent responsible for the ticket.
- Team: the team the ticket is assigned to.
- Requester: the user who submitted the ticket.
Quick Actions
The Quick Actions button on every ticket detail page consolidates common operations into a single dropdown menu. From here agents can edit the ticket, reassign it to another agent or team, link an asset, apply a task template, or close the ticket without leaving the page.
Changing ticket status
Select Change Status from the Quick Actions menu to move a ticket to Open, Pending, On Hold, or Closed. The modal optionally lets you include a message to the user, which is sent as a reply on the ticket at the same time as the status changes. When closing a ticket the user receives a closure notification; for other status changes they receive a standard agent reply notification.
Replying to tickets
Agents reply to tickets directly from the ticket detail page using a rich text editor. Replies support full formatting including headings, bold, italic, lists, links, and code blocks. Formatted replies are rendered in both the admin panel and the user portal.
Users are notified by email whenever an agent replies. They can respond via the portal or by replying directly to the notification email.
Activity log
Every ticket maintains an activity log showing status changes, assignments, and replies in chronological order. This gives agents and admins a complete audit trail of what happened and when.
Closing tickets
Agents can close a ticket via the Quick Actions menu. If the ticket has any incomplete tasks, the agent must complete all tasks before closing is permitted. Admins can override this and close the ticket immediately; any remaining open tasks will be marked as complete automatically. When closed, the user receives an email notification with a link to reopen the ticket. Users can also reopen directly from the portal.
Reopening a closed ticket
There are two ways a user can reopen a closed ticket:
- Via the portal: the user visits the closed ticket and clicks Reopen. They can optionally include a message, which is posted as a reply on the ticket.
- Via the closure email: the closure notification email includes a Reopen ticket link. Clicking it reopens the ticket automatically without requiring login. The link expires after 7 days.
In both cases the ticket returns to Open status and the assigned agent is notified. Agents can also reopen a closed ticket themselves via Quick Actions › Change Status.
Exporting a ticket as PDF
Select Export PDF from the Quick Actions menu on any ticket. The PDF includes the ticket header (subject, ID, status, priority, requester, assignee, and team), any form field responses if the ticket came via a custom form, the original description, and the full conversation thread. Internal notes are excluded. The file downloads as ticket-[id].pdf.
The PDF uses your organisation's brand colour, accent colour, and logo as configured under Settings › Organisation.
Tip: Useful for attaching to vendor requests, audit trails, or handover documentation.
Tasks
Tasks are checklist items attached to a ticket. They give agents a structured list of steps to complete before a ticket can be closed, ensuring nothing is skipped on repeat or multi-step requests.
Adding tasks to a ticket
Open any ticket and scroll to the Tasks section below the ticket details. Click Add task to create a new checklist item, give it a name, and save. Tasks can be added, reordered, and deleted at any time while the ticket is open.
You can also apply a Canned Task List to a ticket via the Quick Actions menu, which creates a set of predefined tasks in one step.
Completing tasks
Agents check off tasks directly on the ticket detail page. Each task shows a checkbox and the task name. Completed tasks are crossed out. The task list shows a count of completed vs total tasks so agents can see progress at a glance.
Tasks and ticket closing
Agents cannot close a ticket that has incomplete tasks. The close action is blocked until all tasks are checked off. This acts as a safety net to prevent a ticket being resolved before the underlying work is done.
Admins can override this restriction. When an admin closes a ticket with open tasks, a confirmation step is shown. Confirming will close the ticket and automatically mark all remaining tasks as complete.
Tip: Use tasks for multi-step processes like new starter onboarding or account setups where each step needs to be confirmed done. The task guard ensures no step is accidentally skipped.
Canned task lists
Canned task lists are reusable task templates. Admins define a named set of tasks once, and agents can apply that template to any ticket with a single action. This saves time on recurring processes and ensures steps are consistently applied each time.
Admin only: Creating and editing canned task lists is restricted to admins. The Canned Task Lists item only appears in the Settings navigation for admin accounts.
Creating a canned task list
Go to Settings › Canned Task Lists in the admin panel. Click New canned task list, give it a descriptive name (e.g. New Starter Onboarding, Account Setup), and add each task item. Save when done. The list is immediately available for agents to apply.
Applying a canned task list to a ticket
From any ticket, open the Quick Actions menu and select Apply Task List. Choose the template to apply and confirm. All tasks from the selected list are added to the ticket instantly. Tasks can be added or removed individually afterwards if needed.
Example: A New Starter Onboarding list might include: Create Active Directory account, Order laptop, Set up email, Grant system access, Schedule orientation. Applying this list to every new starter ticket ensures no step is missed.
Canned responses
Canned responses are pre-written reply templates that agents can insert when replying to a ticket. They save time on frequently sent messages and help your team maintain consistent, well-worded communications.
Admin only: Creating and editing canned responses is restricted to admins. The Canned Responses item only appears in the Settings navigation for admin accounts.
Creating a canned response
Go to Settings › Canned Responses in the admin panel. Click New canned response, give it a name (used to identify it in the list), write the response body, and save. The body supports full markdown formatting.
Using a canned response
When composing a reply on a ticket, click the Canned Responses button in the reply toolbar. Select a response from the list and its content is inserted into the reply editor. Agents can edit the inserted text before sending if the message needs personalising for the specific ticket.
Tip: Give each canned response a clear, specific name so agents can find the right one quickly. Examples: Password reset instructions, Request received, investigating, Waiting on vendor, will follow up.
Knowledge base
The knowledge base is a self-service help centre of articles your customers can read in the portal. Well-written articles deflect repetitive questions, so your team spends less time answering the same things and customers get answers instantly, day or night.
Categories
Group related articles into categories so they're easy to browse. In the admin panel go to Knowledge Base › Categories, click New category, and give it a name (the URL slug is generated for you), an optional description, and a sort order that controls where it appears.
Writing articles
Go to Knowledge Base › Articles and click New article. Give it a title (the slug auto-fills), a short excerpt used in listings and search results, and the body using the rich-text editor. Assign it to a category, then choose its visibility and publish it when it's ready.
Who can write articles: both admins and agents can create and edit knowledge base articles and categories. Customers never see the admin panel.
Public vs internal articles
Every article has a visibility setting:
- Public — visible to customers in the portal help centre (once published), and to agents.
- Internal — visible only to admins and agents inside the admin panel. Use these for runbooks, escalation steps, and internal guidance. Internal articles never appear in the customer portal.
Only articles that are both Public and Published appear to customers. Drafts and internal articles are never reachable from the portal, even by direct link.
How customers find articles
- Help centre: customers open Help in the portal navigation to browse articles, search by keyword, and filter by category.
- Suggested while raising a ticket: as a customer searches for a request type on the new ticket screen, matching public articles are surfaced inline — giving them a chance to self-serve before a ticket is ever created.
Tip: Write articles for the questions your team answers most often, and give each a clear, specific title. Strong titles and excerpts make both portal search and the suggested-article prompts far more effective.
Email to ticket
TicketMate can receive emails and automatically convert them into support tickets. This means users can submit tickets simply by emailing your support address, with no portal login required.
Setting up a mailbox
Configure your inbound mailbox under Settings › Mailboxes in the admin panel. You'll be given an inbound address to forward to (or set as the destination for your support alias). Emails sent to this address are processed automatically.
How inbound emails are processed
- New emails from unknown addresses create a new ticket and a new user account.
- Replies to existing notification emails are attached to the correct ticket automatically using the message thread ID.
- The email subject becomes the ticket subject.
- The email body becomes the ticket description or reply body.
- Attachments are extracted and stored securely on the ticket.
Reply parsing
When a user replies to a notification email, TicketMate strips out the quoted previous reply (the section below the ##- Write your reply above this line -## marker) and attaches only the new content. Best efforts are made to remove email signatures as well. Most common signature formats are detected and removed automatically.
Note: Some complex or non-standard email signatures may not be detected. Advise users to type their reply above the quoted line for the cleanest results.
Inbound email log
Every inbound email is logged under Settings › Inbound Emails. Admins can see the status of each received email (queued, processed, or failed), view any error details, and reprocess failed emails directly from the admin panel. This is useful for diagnosing delivery issues without needing to contact support.
Email notifications
TicketMate sends automated email notifications to keep agents and users informed at each stage of the ticket lifecycle.
Notification types
- New ticket (agents): sent to the assigned agent (or all agents if unassigned) when a new ticket is created.
- Ticket assigned (agent): sent to an agent when a ticket is assigned to them.
- Agent reply (user): sent to the user when an agent posts a reply.
- User reply (agent): sent to the assigned agent when a user replies.
- Ticket closed (user): sent to the user when their ticket is closed or resolved.
Replying by email
All notification emails include a ##- Write your reply above this line -## marker. Users and agents can reply directly to any notification. The content above the marker is extracted and attached to the ticket as a new reply.
Toggling notifications
Notification preferences can be managed per-workspace under Settings › Notifications. Individual notification types can be enabled or disabled.
Email templates
Admins can customise the subject line and body of each notification email under Settings › Email Templates. Templates use a markdown editor and support dynamic variables that are replaced with real values at send time.
Available variables
| Variable | Description | Available in |
|---|---|---|
{{agent_name}} |
The name of the assigned agent | New ticket, Ticket assigned |
{{customer_name}} |
The user's display name | Agent reply, Ticket closed |
{{ticket_subject}} |
The ticket subject line | All templates |
{{ticket_id}} |
Short ticket ID (first 8 characters) | All templates |
{{ticket_url}} |
Full URL to the ticket in the portal | All templates |
{{requester_name}} |
Name of the person who submitted the ticket | New ticket, Ticket assigned |
{{priority}} |
Ticket priority level | New ticket, Ticket assigned |
{{reply_body}} |
The body of the agent's reply | Agent reply |
{{closing_message}} |
Optional message included when closing a ticket | Ticket closed |
{{company_name}} |
Your organisation name from workspace settings | All templates |
Tip: If a template is left blank, TicketMate falls back to its built-in default layout. You only need to customise the templates you want to change.
Custom forms
Custom forms let you collect structured information from users for specific request types, including account changes, billing enquiries, service requests, and so on. Instead of a free-text description, users fill in a structured set of fields.
Building a form
Forms are built in the admin panel under Forms. Each form has a name and a set of fields. Supported field types include:
- Text: single-line text input.
- Textarea: multi-line text input for longer answers.
- Select: a dropdown with predefined options.
- Checkbox: a yes/no toggle.
- Date: a date picker.
Publishing a form
Once a form is saved, it appears in the user portal under Submit a request. Users choose the form that matches their request type and fill in the fields. Submissions create a new ticket with the form responses formatted clearly in the ticket body. Each question is followed by the user's answer, making triage quick and consistent.
Routing form submissions
Each form can be assigned a default team and priority, so submissions are automatically routed to the right group without manual intervention.
Teams
Teams let you group agents and route tickets to the right people. A ticket assigned to a team will notify all agents in that team, and any team member can take ownership.
Creating a team
Go to Teams in the admin panel and create a new team. Give it a name (e.g. Billing, Technical Support, General Enquiries) and add agents as members.
Assigning tickets to teams
When creating or editing a ticket, agents can assign it to a team in addition to (or instead of) an individual agent. Users submitting via the portal can also select a preferred team if your admin has enabled that option on the intake form.
Automatic routing
Custom forms and email routing rules (see below) can automatically assign incoming tickets to a specific team, removing the need for manual triage on common request types.
User management
Admins manage all workspace users under People › Users. The user list shows each person's name, email, role, and whether their account is active. Deactivated accounts are hidden by default and can be revealed with the filter controls.
Inviting users
Click Invite User to create a new account. The new user receives an email with a secure link to set their password. You can also send a fresh invitation link at any time from the user's action menu if they have not yet set a password.
Bulk import via CSV
To add multiple users at once, use the Import button. Download the sample CSV template, fill in each user's name, email address, role (admin, agent, or user), and whether to send an invite email (y or n). Upload the completed file and TicketMate will create the accounts and send invitations in the background. Any rows with validation errors (duplicate email, invalid role, etc.) are reported after the import completes.
Roles
- Admin: full access to the admin panel, settings, and all tickets.
- Agent: can view and manage tickets; no access to billing or workspace settings.
- User: user-level access; can use the portal to submit and track their own tickets only.
Deactivating users
Agents who leave the team can be deactivated rather than deleted. Deactivated accounts cannot log in but their ticket history is preserved. A user with open tickets assigned to them cannot be deactivated until those tickets are reassigned. Accounts can be reactivated at any time.
MFA reset
If an agent or admin loses access to their authenticator app, an admin can reset their MFA from the user's action menu. The user will be prompted to set up MFA again on next login.
Email routing
Email routing rules let you automatically assign, prioritise, or categorise incoming tickets based on keywords in the subject or body. This is useful for handling recurring request types without manual triage.
Setting up routing rules
Routing rules are configured under Settings › Email Routing. Each rule defines:
- Keyword: a word or phrase to match against the email subject or body.
- Action: what to do when a match is found, e.g. assign to a team, set a priority, or set a ticket type.
Example: A rule matching the keyword "password reset" could automatically assign the ticket to your Helpdesk team with Low priority, skipping manual review entirely.
Rule evaluation
Rules are evaluated in order when a new inbound email arrives. The first matching rule is applied. If no rule matches, the ticket is created with the default settings for that mailbox.
SLA policies
SLA (Service Level Agreement) policies let you define response and resolution time targets for different ticket types. TicketMate tracks these deadlines automatically and alerts your team when a ticket is approaching or has breached its SLA.
Plan note: SLA policies are included on the Standard plan.
Creating an SLA policy
Policies are configured under Settings › SLA Policies. Each policy defines:
- Response time: how long before an agent must first respond to the ticket.
- Resolution time: how long before the ticket must be fully resolved.
- Business hours: whether deadlines count calendar time or business hours only.
Business hours
When an SLA policy has Business hours enabled, TicketMate counts time only during your configured working hours. Configure this under Settings › Organisation in the Business Hours section:
- Timezone: choose your local timezone; all SLA deadline calculations use this timezone.
- Working hours: set the start and end time in 24-hour format (e.g. 09:00 to 17:00).
- Working days: tick the days your team is available (e.g. Monday to Friday).
Tickets that arrive outside business hours will have their SLA clock start from the next opening time.
Tip: Set your timezone before enabling business-hours SLA policies. If left as UTC, deadlines may be calculated against the wrong working window.
Breach notifications
When a ticket breaches its SLA deadline, the assigned agent and team are notified automatically. Breached tickets are also highlighted in the ticket list so they can be prioritised immediately.
Assigning policies to tickets
SLA policies are assigned at the ticket level. You can assign a policy manually or configure your email routing rules and custom forms to apply a policy automatically based on ticket type or priority.
Asset management
TicketMate includes a built-in asset register so you can track the equipment and items your team supports. Assets can be linked to tickets, assigned to users, and monitored for warranty expiry.
Plan note: Asset management is included on the Standard plan (up to 100 assets); unlimited on Enterprise.
Adding assets
Assets are managed under Assets in the admin panel. Each asset record can include:
- Category, make, and model for easy identification.
- Serial number for inventory tracking.
- Assigned user so you know who has each item.
- Warranty expiry date: TicketMate will notify you automatically before warranties lapse.
- Encrypted notes for sensitive details such as licence keys or access credentials. These are stored encrypted at rest.
Linking assets to tickets
When an agent is working a ticket, they can link one or more assets to it. This gives context about the affected asset and makes it easy to pull up the asset history across multiple tickets over time.
Warranty expiry alerts
TicketMate checks for upcoming warranty expirations daily and sends alerts to admins in advance. This helps your team plan replacement cycles and avoid being caught with unsupported equipment.
Security & MFA
TicketMate includes multi-factor authentication (MFA) for both agents and users. MFA adds a second verification step at login, protecting accounts even if a password is compromised.
Setting up MFA (agents & users)
- Log in to the admin panel or portal.
- Navigate to your Profile or Account settings.
- Select Enable two-factor authentication.
- Scan the QR code with an authenticator app (Google Authenticator, Authy, 1Password, etc.).
- Enter the 6-digit code to confirm setup.
Enforcing MFA workspace-wide
Admins can require MFA for all users in their workspace under Settings › Security. When enabled, users who have not yet set up MFA will be prompted to do so on their next login before accessing any content.
Recovery
If a user loses access to their authenticator, an admin can disable MFA for that account from the Users management screen, allowing them to log in and re-enrol.
Single Sign-On (SSO)
SSO lets your portal users sign in with their existing Google Workspace or Microsoft Entra ID (Azure AD) account instead of a separate TicketMate password. Once configured, a "Sign in with Google" or "Sign in with Microsoft" button appears on the portal login page.
Plan note: SSO is included on the Standard plan. Configure your provider under Settings in the admin panel.
TicketMate uses a bring-your-own OAuth app model. Each organisation registers their own OAuth credentials with Google or Microsoft rather than sharing a TicketMate-managed app. This means your users authenticate directly against your own identity provider, and you retain full control over access.
Setting up Google Workspace SSO
- Go to Google Cloud Console (console.cloud.google.com) and create a new project, or select an existing one.
- Navigate to APIs & Services › OAuth consent screen. Set User Type to Internal to restrict login to your Google Workspace organisation only. Fill in the required fields and save.
- Go to APIs & Services › Credentials › Create Credentials › OAuth 2.0 Client ID. Set the application type to Web application.
- Under Authorised redirect URIs, add the following (you can register multiple; add both if you want SSO on both the customer portal and the admin panel):
https://yourdomain.ticketmate.au/portal/auth/google/callbackhttps://yourdomain.ticketmate.au/admin/auth/google/callback - Click Create and copy the Client ID and Client Secret.
- In TicketMate, go to Settings › Organisation › Single Sign-On, select Google Workspace, paste both values, and save.
Note: Setting User Type to Internal restricts login to users within your Google Workspace organisation. If you do not have Google Workspace (i.e. you use personal @gmail.com accounts), set it to External, but be aware that any Google account will be able to authenticate.
Setting up Microsoft Entra ID (Azure AD) SSO
- Go to the Azure Portal (portal.azure.com) and navigate to Microsoft Entra ID › App registrations › New registration.
- Give the app a name (e.g. TicketMate). Under Supported account types, select Accounts in this organisational directory only (YourTenantName only, Single tenant) to restrict login to your org.
- Under Redirect URI, select Web and enter:
https://yourdomain.ticketmate.au/portal/auth/azure/callback. After registering, you can add additional URIs under Authentication › Add a URI; addhttps://yourdomain.ticketmate.au/admin/auth/azure/callbackif you also want SSO on the admin panel. - Click Register. From the Overview page, copy the Application (client) ID and the Directory (tenant) ID.
- Navigate to Certificates & secrets › New client secret. Set an expiry and click Add. Copy the Value immediately; it will not be shown again.
- In TicketMate, go to Settings › Organisation › Single Sign-On, select Microsoft Entra ID, paste the Client ID, Client Secret, and Directory (Tenant) ID, then save.
Tip: The Directory (Tenant) ID field restricts login to accounts within your specific Azure AD directory. Leave it blank only if you want to allow any Microsoft account to authenticate, which is not recommended for most organisations.
Restricting which users can sign in: When you register an app, Azure automatically creates a corresponding Enterprise Application in your tenant. By default, any user in your directory can authenticate. To restrict SSO access to specific users or groups, go to Microsoft Entra ID › Enterprise Applications, find your app, open Properties, and set Assignment required to Yes. Then assign the permitted users or groups under Users and groups.
How SSO login works
- SSO is available on both the customer portal login page and the admin panel login page. Both use the same OAuth app credentials configured in Settings.
- On first login, TicketMate matches the authenticated user to an existing account by email address. If a match is found, the SSO identity is linked to that account.
- For Microsoft Entra ID, TicketMate uses the account's email address (the
mailattribute) rather than the login username (UPN) for matching. This ensures users who have previously submitted tickets by email are correctly linked to their SSO identity, even when the two addresses differ. - If no existing account matches, a new portal customer account is created automatically using the name and email returned by the identity provider. Admin panel SSO does not create new accounts; the user must already exist.
- On all subsequent logins, the match is done by the provider's unique user ID, so the account remains linked even if the user's email address changes.
- SSO logins bypass the TicketMate in-app MFA prompt on both the portal and admin panel. The security of your external identity provider (including any MFA it enforces) is used instead.
Important notes
- The redirect URI must match exactly. Any difference between what is registered in Google or Azure and the URL in TicketMate (including
httpvshttpsor a trailing slash) will cause login to fail. - Client secrets expire. Microsoft Azure client secrets have an expiry date. Set a reminder to rotate the secret before it expires and update it in Organisation Settings before it lapses, or SSO logins will start failing.
- Disabling SSO will lock out SSO-only users. Users who signed in exclusively via SSO and never set a TicketMate password will not be able to log in if SSO is removed. Those users should use the Forgot Password link on the portal login page to set a password before SSO is disabled.
AI Assistant
The AI Assistant lets agents ask Claude AI questions directly from the ticket view. Agents can ask it to draft a reply, suggest an escalation path, identify the root cause of an issue, or summarise a long thread, without leaving the ticket.
Plan note: AI Assistant is available as a pay-as-you-go add-on on the Standard plan, billed at $5 per 250 calls per month (included on Enterprise). Enable it from Billing in the admin panel.
Enabling the AI Assistant
- Go to Billing in the admin panel. If your plan supports the AI Assistant add-on, an Add AI Assistant card will appear. Click it to add the metered item to your subscription via the Stripe Billing Portal.
- Once the subscription item is active, go to Settings › Organisation. An AI Assistant section will appear. Enable the toggle to make the assistant visible to agents.
- Agents will now see an AI Assistant panel below the task checklist on every ticket.
Data residency note: When an agent uses the AI Assistant, the ticket subject, description, all replies, internal notes, and the requester's email address are sent to Anthropic's API to generate a response. This data leaves Australian infrastructure. Only enable the AI Assistant if this is permitted by your customers and any applicable compliance obligations.
Using the assistant
The AI Assistant panel on each ticket is collapsed by default. Click the panel header to expand it. Type a question and press Send or Ctrl+Enter. The assistant responds using the full ticket context: subject, description, all replies, internal notes, and the requester's email address, without you needing to paste anything in.
You can ask follow-up questions in the same session. The conversation is held in memory for the duration of the page visit and is not saved once you navigate away. Each message sent counts as one call for billing purposes.
Suggested uses
- Draft a reply: "Draft a professional reply letting the user know we're investigating and expect a fix by end of day."
- Summarise a long thread: "Summarise this ticket in two sentences for a handover note."
- Suggest next steps: "What should I check first for an email sync issue affecting multiple users?"
- Escalation decision: "Based on the impact described, should this be escalated to Critical priority?"
Billing
Usage is metered; you only pay for what you use. Each AI call costs the equivalent of $5 per 250 calls (billed in packages of 250, rounded up). Usage is totalled across the billing period and charged at month end via Stripe. The panel header shows a running count of calls used in the current month.
Data residency
All TicketMate data, including tickets, user records, file attachments, and email content, is stored and processed exclusively in Australia. The application and database run on DigitalOcean infrastructure in the Sydney region, managed via Laravel Forge. File storage and email delivery use Australian AWS infrastructure.
What this means for your organisation
- Your data is subject to Australian law, not US or EU jurisdiction.
- We will never move customer data offshore.
- File attachments are stored in S3 in the ap-southeast-2 (Sydney) region.
- Email delivery uses Amazon SES via Australian endpoints.
- No third-party analytics or tracking tools with offshore data processing are embedded in the admin panel or user portal.
Australian Privacy Act compliance: TicketMate is built with the Australian Privacy Principles (APPs) in mind. Data residency within Australia is a foundational design decision, not an afterthought.
Questions?
If you have specific compliance requirements or need documentation for an internal review, get in touch and we'll be happy to help.